How to edit talking head videos: timeline vs text-based, step by step
By captionrich team · Published November 16, 2026 · 12 min read
To edit a talking head video, work in this order: cut the mistakes and dead air, tighten the pacing, add punch-in zooms so one camera angle does not sit still, cover a few moments with B-roll, add captions, then export in the shape each platform expects. In a traditional timeline editor you do each step by hand on tracks. In a text-based editor the recording is transcribed first, so you cut by deleting words and the later steps attach to the transcript. A timeline editor is still the better choice for long videos, multi-camera shoots, and frame-level work.

What a talking head video is
A talking head video is one person speaking to the camera, usually framed from the chest or shoulders up, where the speech carries the content. Tutorials, explainers, course lessons, founder updates, product reviews, and most short-form advice clips are talking heads.
The format is simple to record and hard to make watchable. There is one angle, one subject, and no action, so every pause, restart, and "um" is on screen. Talking head video editing is mostly two jobs: removing what the speaker did not mean to say, then adding enough visual change that a single shot holds attention. The steps below follow from that.
The six steps of talking head video editing, in order
- Cut mistakes and dead air. Remove false starts, repeated takes, long pauses, and filler words.
- Tighten the pacing. Shorten the gaps between sentences and delete the lines that repeat a point you already made.
- Add punch-in zooms. Change the framing on key lines so the shot does not sit still, and so jump cuts read as intentional.
- Add B-roll. Cover a few moments with footage or an image of the thing you are describing.
- Add captions. Put the words on screen, then proofread names and numbers.
- Export for each platform. Pick the frame shape and resolution for where the video will be posted.
Each step below is described twice: once for a traditional timeline editor such as Premiere Pro, DaVinci Resolve, or CapCut, and once for a text-based editor. The text-based examples use captionrich, whose talking head editor runs in the browser. The steps for timeline editors are kept generic, because menus and shortcuts differ between apps and versions.
Step 1: Cut mistakes and dead air
This step takes the most time, and it is where the two kinds of editor differ the most.
In a timeline editor
Put the recording on the timeline and play it while watching the audio waveform. Flat stretches are pauses. A phrase whose shape repeats two or three times in a row is usually a retake. At each mistake, split the clip before and after it with the razor or blade tool, select the bad piece, and ripple delete it so the rest of the timeline closes the gap. Repeat to the end of the recording. The method is precise, and it is slow, because you have to listen to the whole recording at least once to find what to remove.
In a text-based editor
A text-based editor transcribes the recording with a timestamp on every word and shows you the transcript. You read instead of listening. Select the sentence you flubbed, delete it, and that stretch of footage is cut. In captionrich the cut is non-destructive: the original file is not changed, and any deleted words can be restored.
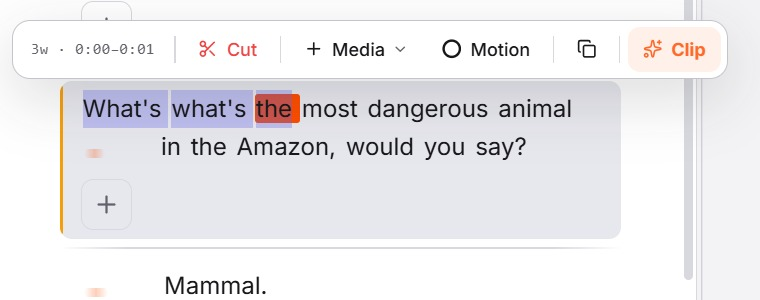
The repetitive parts are tools, so you do not select each one by hand:
- Remove Silences cuts pauses with three presets. Light removes pauses longer than 0.8 seconds, Medium 0.45 seconds, and Aggressive 0.29 seconds, and each cut keeps a little padding so words are not clipped.
- Filler Words sends the transcript to an AI model that judges each "um", "uh", and "like" in context, so "I like this one" stays and a stalled "like" goes.
- Remove Bad Takes looks for lines you started, stopped, and redid. It keeps the last attempt and cuts the earlier ones, and turning it off restores exactly what it removed.
Remove Silences is on every plan, including Free. Filler Words and Remove Bad Takes use AI credits, which are part of the paid plans. Without them you can still delete fillers and retakes by selecting the words yourself.
Step 2: Tighten the pacing
With the mistakes gone, watch the cut once at normal speed. Pacing problems are not mistakes. They are correct sentences the video does not need: a line that repeats the one before it, an intro that takes three sentences to start, a long breath before the point.
In a timeline editor, drag the edge of each clip to trim its start and end, then nudge frame by frame until the cut sounds natural. Play across every cut. A cut that lands in the middle of a breath or clips the first consonant of a word is audible even when it looks fine.
In a text-based editor, delete the sentences you do not need, the same way you would edit a draft. If the whole video feels slow, move Remove Silences from Light to Medium. When one cut lands too tight, fix it on the waveform timeline under the preview: captionrich lets you trim, split, and move clips there, and the transcript stays in sync with it.
Step 3: Add punch-in zooms
A punch-in is a change of framing on the same shot: the picture scales up on the speaker for a line, then returns. It does two things in a talking head video. It puts weight on a line, and it hides jump cuts, because a cut between two different framings reads as a camera change instead of a glitch.
In a timeline editor, split the clip at the start and end of the line, raise the Scale of the middle piece, and reposition it so the eyes stay at the same height. For a gradual push, keyframe the scale across the line. If you recorded at a higher resolution than you export, for example 4K for a 1080p video, the zoomed shot stays sharp.
In captionrich, Scene Zoom adds a zoom to a scene in one click, with styles such as Crash Zoom, Slow Push In, and Punch In. Smart Jump Cuts is a single toggle that adds a quick punch-in at every cut, so the places where footage was removed look deliberate. Both work on the Free plan. Use zooms on the lines that matter. A zoom on every sentence stops meaning anything.
Step 4: Add B-roll
B-roll is footage or an image shown while the speaker keeps talking. In a talking head video it shows the thing you are describing and gives the viewer a second picture to look at. Place it where you name something concrete, such as a product, a place, or a screen, and leave the speaker on camera for opinions and the opening line.
In a timeline editor, import the clip, put it on the video track above the main recording, trim it to the phrase it illustrates, and mute its audio. If you re-cut the main track later, check that each B-roll clip still sits over the right words.
In captionrich, select the words, open the Media menu, and search stock video, photos, or GIFs, or upload your own file. The clip is placed on those words and stays attached to them when you cut earlier parts of the video. Auto B-Roll does the placement for you: it reads the transcript and puts stock footage on the phrases that name something you can show. It is a paid feature. The full method, including layouts, is in how to add B-roll to a video.
Step 5: Add captions
In a talking head video the speech is the content, so a viewer watching with the sound off gets nothing without captions. Captions also give you a second place to add emphasis: the word on screen can be larger or a different colour at the moment it is said.
In a timeline editor, captions are a separate pass at the end. Many editors can generate a caption track from the audio. You then correct the text, split lines that run too long, and style the track. Where there is no generator, you type each caption into a text clip and time it by hand.
In a text-based editor the transcript already exists, so auto captions are the same words you have been editing. In captionrich you pick one of 40+ animated styles, fix a misheard word once, and the caption follows every cut you made. On vertical videos you can switch on safe-zone overlays for TikTok, Reels, and Shorts to check that the captions sit clear of each app's buttons and description.
Step 6: Export for each platform
Decide the frame shape before you position captions and B-roll, because a layout that works in vertical does not work in landscape. captionrich's export presets show the usual targets:
| Preset | Shape | Size |
|---|---|---|
| TikTok, Reels, Shorts | 9:16 vertical | 1080 x 1920 |
| IG Square | 1:1 | 1080 x 1080 |
| IG 4:5 | 4:5 portrait | 1080 x 1350 |
| YouTube | 16:9 landscape | 1920 x 1080 |
In a timeline editor, set the sequence or project to that frame size, reframe each shot if the source has a different shape, and export an H.264 MP4. You control the codec and bitrate directly, which matters when a client or broadcaster gives you a delivery spec.
In captionrich, the export runs in your browser and writes an MP4 (H.264) or WebM file. The preview and the export are drawn by the same renderer, so the file matches what you saw while editing.
Timeline editor vs text-based editor, step by step
| Step | Timeline editor | Text-based editor |
|---|---|---|
| Find mistakes | Listen and watch the waveform | Read the transcript |
| Cut mistakes | Split the clip, ripple delete | Select the words, delete |
| Pauses and filler words | One cut at a time | A preset or a detection pass |
| Tighten pacing | Trim clip edges by frame | Delete sentences, then fine-trim on the waveform |
| Punch-in zooms | Split and scale, or keyframe | Add a zoom to a scene |
| B-roll | Place a clip on an upper track | Select words, insert media |
| Captions | A separate pass at the end | Already transcribed, pick a style |
| Export | Full control of codec and bitrate | Platform presets |
| Long or multi-camera projects | Yes | Limited |
When a timeline editor is still the better choice
A text-based talking head video editor is quicker for short, speech-driven videos. It is the wrong tool in these cases:
- The video is long. The captionrich editor takes videos up to 3 minutes on Free, 4 minutes on Pro, and 7 minutes on Max Pro. A 20-minute YouTube video belongs in a timeline editor. Auto Clipper accepts long recordings, but its job is to cut them into shorts, not to edit the full video.
- You shot with more than one camera. Syncing two or more angles and switching between them is a timeline job.
- The edit needs frame-level control. Cuts timed to music, match cuts, masking, compositing, and detailed colour work are done on a timeline.
- There is little speech, or the audio is poor. A transcript is only as useful as the words in it. Heavy background noise and people talking over each other lower transcription accuracy, and the cuts depend on it.
- You are already fast in a timeline editor. If you have presets, templates, and shortcuts that work, switching tools for one step may not save time.
The two are not exclusive. You can make the rough cut by editing text, then finish on a timeline. captionrich's Export screen has an Editor files tab that downloads the edit as an XML sequence for Premiere Pro and DaVinci Resolve, an FCPXML project for Final Cut Pro, or an EDL. Cuts, gaps, speed changes, mutes, and captions (as markers) travel in those files. Layouts, B-roll, and effects do not, so add those in the editor where you finish.
Mistakes that make talking head videos harder to watch
- Styling before the cut is locked. Captions, zooms, and B-roll placed on a sentence you later delete are wasted work.
- Cutting every breath. A video with no pauses is tiring to follow. Keep the pauses that set up a point.
- Zooming on every line. A punch-in marks emphasis. Used on everything, it marks nothing.
- Covering the opening line with B-roll. The first seconds tell the viewer who is talking. Stay on the face, then cut away.
- Skipping the proofread. Names, brand names, and numbers are where speech-to-text slips most. Read the captions once before you export.
- Putting captions under the app's buttons. Check the caption position against the platform you post to before exporting.
Frequently asked questions
- What is a talking head video?
- A video of one person speaking to the camera, usually framed from the chest or shoulders up, where the speech carries the content. Tutorials, explainers, lessons, and most short-form advice clips are talking head videos.
- What is the best order to edit a talking head video?
- Cut mistakes and dead air, tighten the pacing, add punch-in zooms, add B-roll, add captions, then export. Cuts come first because they change the length of the video, and captions come last because they depend on the final cut.
- Which talking head video editor should I use?
- For short, speech-driven videos a text-based editor is quicker, because you cut by deleting words and the captions come from the same transcript. For long videos, multi-camera shoots, or frame-level work, use a timeline editor such as Premiere Pro, DaVinci Resolve, or Final Cut Pro.
- How do I make a talking head video less static?
- Remove the gaps, add a punch-in zoom on the lines that matter, show B-roll when you name something concrete, and keep captions on screen. Each one changes the picture without needing a second camera.
- Do I need to record a talking head video in one take?
- No. When you make a mistake, pause and say the sentence again from the start, then keep going. Clean restarts are quick to remove in any editor, and a bad-take tool keeps the last attempt.
- Can I edit a talking head video for free?
- Yes. The captionrich Free plan covers 3 videos a month, up to 3 minutes each, with no watermark. It includes transcription, text-based cuts, Remove Silences, zooms, caption styles, and export. The AI tools, such as Filler Words, Remove Bad Takes, and Auto B-Roll, are on the paid plans.
- Can I start in a text-based editor and finish in Premiere Pro or DaVinci Resolve?
- Yes. captionrich exports the edit as XML for Premiere Pro and DaVinci Resolve, FCPXML for Final Cut Pro, or an EDL. Cuts, gaps, speed changes, mutes, and caption markers carry over. B-roll, layouts, and effects do not.